
LionWheel Delivery Management Guide
The recommended page for simple delivery management is the Deliveries page, which displays them conveniently in both table and map views. On this page, you can filter and sort deliveries, search for deliveries, customize the display according to your needs, and edit details for multiple deliveries with a single click.
* Clicking on the delivery ID will open the delivery details in the same window.
Sorting and Filtering Deliveries on the Page
- First, you need to define:
1. The deliveries status (Open/Closed/Canceled) and the type of tasks (relevant only for those with pickup tasks).
2. The period for display: Today/Tomorrow/This month/Custom Range, etc.
* You can set the default display period through Settings => General.

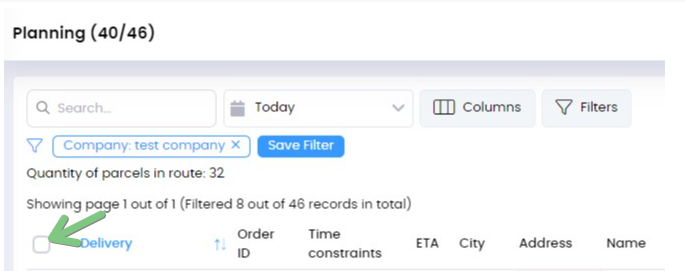
- To filter deliveries, click on Filters, select the desired filters, and the results will be displayed in both the table and the map.
* You can save the filter with a name for easy reuse later.
For example, selecting all deliveries assigned to a specific driver or city etc. - To sort deliveries, click on the column header you want to sort by.
For example, clicking on the "Creation Date" column will sort the deliveries in ascending/descending order by their date and time.
* To change the order of the columns, drag and move the column header sideways.
- Search for a delivery by delivery ID, order ID, name, address, and any other parameters shown in the selected columns.
Note: The search is conducted on the current page using selected filters. If no results are found, try the top search bar or change the search value.
*Click 'Items' (top right) for a consolidated pick list of all deliveries. (Set display columns in the pick list via Settings).
Verification Statuses
There is an option to send SMS notification to the recipient with a link to the validation page. On this page, they can modify delivery details and approve/reject the delivery .
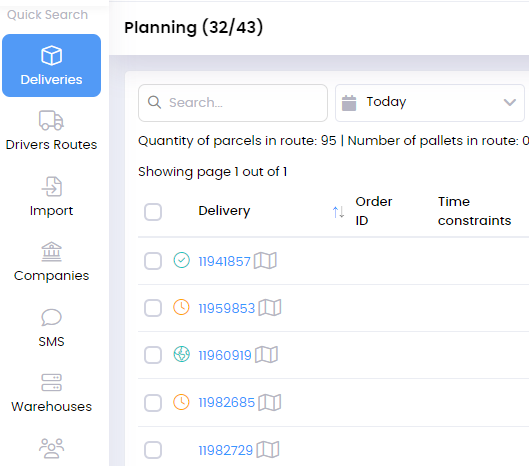
The statuses are displayed in the delivery table with the following symbols (they can also be found under filters):
✅- Delivery approved
❌- Delivery rejected (if reject option is enabled)
🌐- Delivery approved and address updated
🕒- Rescheduled; the delivery was initially rejected by the customer, then the delivery date was changed
Map
On the map, you can view deliveries (after filtering), plan driver routes, and get a clear status overview. The points on the map are color-coded according to each driver profile.
* Gray points are deliveries not yet assigned to a driver.
Zones
Used to add areas to the map (view guide).
Drawing Buttons On Map
Used to draw a polygon on the map and edit/print all deliveries within it. When you close the shape around the desired deliveries, an edit and print toolbar will appear.
Edit and Print Toolbar
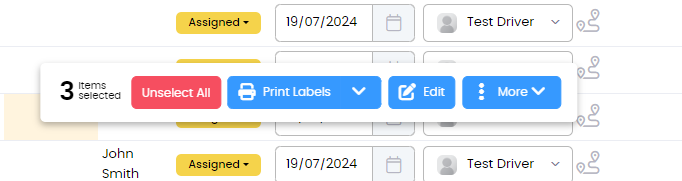
The toolbar appears when you select deliveries using the table or map. On the toolbar, you can print labels/waybills, send SMS, duplicate deliveries, and edit the selected deliveries.
* To select all deliveries in the display, check the checkbox in the column headers row.
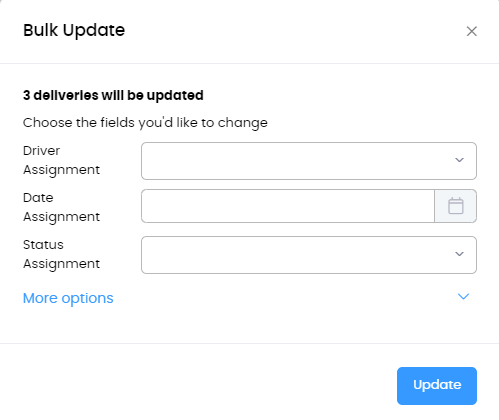
Clicking the Edit button will open the Bulk Update popup,
where you can change the driver/date/status for all selected deliveries.
Using the Bulk Edit to choose a driver will display a button to the driver's route planning page.
Do you have any additional questions?
Feel free to contact us at support@lionwheel.com